Winterize Home Plumbing: Best Tips & Guide

Winterizing your home plumbing is crucial to avoid a host of problems when the temperature drops. Frozen pipes can burst, leading to expensive repairs and water damage. By taking preventive measures, you can ensure your plumbing system remains intact and functional throughout the winter months.
Prevents Costly Repairs
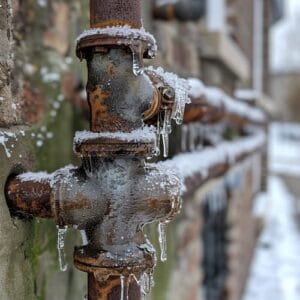
When water freezes, it expands. This can cause pipes to crack or burst, resulting in significant water damage and costly repairs. According to the Insurance Institute for Business & Home Safety, a burst pipe can result in more than $5,000 in damages. Therefore, winterizing your plumbing system is a wise investment to prevent these issues. To save yourself from such costs contact for our trusted plumbing services now.
Enhanced Home Safety
Beyond the financial aspect, burst pipes can also pose safety risks. Water damage can lead to mold growth, which can affect the health of your family. Moreover, standing water can create slippery surfaces, increasing the risk of falls and injuries.
Maintains Proper Water Flow
Frozen pipes can disrupt your water supply, making daily activities like showering, cooking, and cleaning difficult. By winterizing your plumbing, you ensure that water continues to flow smoothly, even during the coldest months. You might also want the temperature in your home to be maintained for that you could use these AC installation services by Chaffee.
Preparation Steps to Winterize Home Plumbing

Before diving into the specifics of how to winterize your plumbing, it’s important to prepare properly. This involves inspecting your plumbing system, identifying vulnerable areas, and gathering the necessary tools and supplies.
- Inspecting Your Plumbing System
- Identifying Vulnerable Areas
- Gathering Necessary Tools and Supplies
Inspecting Your Plumbing System
The first step in winterizing your plumbing is a thorough inspection. Check all the pipes in your home, especially those in unheated areas like the attic, basement, and garage. Look for signs of wear and tear, such as cracks or corrosion. If you find any issues, address them before the temperature drops.
Identifying Vulnerable Areas
Some parts of your plumbing system are more susceptible to freezing than others. Pipes located near exterior walls, windows, and doors are particularly vulnerable. Make a list of these areas so you can give them extra attention during the winterization process.
Gathering Necessary Tools and Supplies
You’ll need a few basic tools and supplies to winterize your plumbing effectively. These include pipe insulation, heat tape, caulk, and sealant. Having everything on hand before you start will make the process smoother and more efficient. On the other hand if you reside in Tennessee you might want to give this a read too : Common summer plumbing issues in Tennessee homes.
Insulating Pipes: A Critical First Step
Insulating your pipes is one of the most effective ways to prevent them from freezing. Proper insulation helps maintain the temperature of the water inside the pipes, reducing the risk of freezing and bursting.
 Insulating Pipes
Start by measuring the length of the pipes you need to insulate. Purchase insulation sleeves or wraps that fit your pipes’ diameter. Cut the insulation to the appropriate length and secure it around the pipes using adhesive or tape.
Types of Pipe Insulation
When it comes to insulating your pipes, there are several types of insulation materials to consider. Each type has its own benefits and is suitable for different situations. The most common types include foam pipe insulation, fiberglass pipe insulation, and rubber pipe insulation.
Foam pipe insulation is widely used due to its affordability and ease of installation. It provides good thermal resistance and is ideal for indoor pipes. Fiberglass pipe insulation, on the other hand, is excellent for high-temperature pipes and offers superior thermal protection. Rubber pipe insulation is flexible and can withstand extreme temperatures, making it perfect for outdoor pipes.
| Type of Insulation | Benefits | Best For |
| Foam Pipe Insulation | Affordable, Easy to Install | Indoor Pipes |
| Fiberglass Pipe Insulation | High Thermal Resistance | High-Temperature Pipes |
| Rubber Pipe Insulation | Flexible, Extreme Temperature Resistance | Outdoor Pipes |
Choosing the right type of insulation depends on the specific needs of your plumbing system. For instance, if you’re insulating pipes in an unheated basement, foam insulation might be the best choice. For outdoor pipes, rubber insulation is more suitable due to its durability and flexibility.
How to Apply Insulation
Applying pipe insulation is a straightforward process that you can do yourself with a few simple steps. Start by measuring the length of the pipes you need to insulate. Cut the insulation material to the appropriate length using a utility knife or scissors.
Next, open the insulation sleeve and wrap it around the pipe. Ensure that the insulation covers the entire length of the pipe, leaving no gaps. Secure the insulation in place using adhesive tape or zip ties. For added protection, you can also apply a layer of heat tape before insulating the pipe.
Seal Leaks to Prevent Water Damage
Sealing leaks in your plumbing system is another crucial step in winterizing your home. Leaks can lead to water damage and increase the risk of pipes freezing. By detecting and repairing leaks early, you can prevent these issues and ensure the longevity of your plumbing system. Leaks could also cause damage in your electrical system but worry not as Chaffee’s Expert electrical solutions has got you covered.
Sealing Leaks
To seal leaks effectively, you need to identify the source of the leak first. Common signs of leaks include water stains on walls or ceilings, damp spots, and an unexplained increase in your water bill. Once you’ve located the leak, you can proceed with the repair.

Detecting and Repairing Leaks
Detecting leaks can be challenging, especially if they are hidden behind walls or under floors. One method to detect leaks is to turn off all water fixtures and check your water meter. If the meter continues to run, it indicates a leak in the system.
For minor leaks, you can use a pipe repair clamp or epoxy putty to seal the leak. These materials are available at most hardware stores and are easy to apply. For more significant leaks or if you’re unsure about the repair, it’s best to call a professional plumber to assess and fix the issue.
Using Caulk and Sealant
Caulk and sealant are essential tools for sealing gaps and cracks around pipes. These materials create a waterproof barrier that prevents water from seeping through and causing damage. Apply caulk around pipe joints, where pipes enter walls, and any other areas where gaps are present.
Ensure that the surface is clean and dry before applying caulk or sealant. Use a caulking gun to apply a steady bead of caulk along the gap. Smooth the caulk with a damp finger or a caulk smoothing tool to ensure a tight seal.
Protecting Outdoor Plumbing During Winter
Outdoor plumbing is particularly vulnerable to freezing temperatures. Taking the necessary precautions can prevent damage and ensure that your outdoor plumbing remains functional throughout the winter.
Preparing Outdoor Plumbing
Start by inspecting all outdoor faucets, hoses, and sprinkler systems. Look for any signs of damage or leaks and repair them before the temperature drops. It’s also a good idea to shut off the water supply to outdoor faucets and drain any remaining water from the pipes.
Disconnecting and Draining Garden Hoses
One of the simplest ways to protect your outdoor plumbing is to disconnect and drain garden hoses. Leaving hoses connected can cause water to back up into the faucet and freeze, leading to burst pipes. After disconnecting the hoses, store them in a dry place to prevent damage.
Ensure that you drain any water remaining in the hose by holding one end up and allowing the water to flow out. For added protection, you can use an air compressor to blow out any remaining water in the hose.
Winter Covers for Outdoor Faucets
Using winter covers for outdoor faucets is an effective way to insulate them from freezing temperatures. These covers are easy to install and provide an extra layer of protection against the cold. Simply place the cover over the faucet and secure it with the attached strap or hook.
For additional insulation, you can wrap the faucet with foam pipe insulation or a towel before placing the cover. This helps to keep the faucet warm and prevent freezing.
How to Winterize Indoor Plumbing Systems
While outdoor plumbing is more susceptible to freezing, indoor plumbing can also be affected by cold temperatures. Taking the necessary steps to winterize your indoor plumbing can prevent damage and ensure that your water supply remains uninterrupted.
 Addressing Interior Plumbing
Start by insulating any exposed pipes in unheated areas such as the basement, attic, and garage. Use foam pipe insulation or heat tape to protect these pipes from freezing. It’s also a good idea to open cabinet doors under sinks to allow warm air to circulate around the pipes.
Draining Water from Pipes
Draining water from your pipes is a crucial step in winterizing your plumbing system. Any water left in the pipes can freeze and expand, leading to cracks or bursts. Start by turning off the main water supply to your home. Open all faucets, both indoors and outdoors, to allow any remaining water to drain out. Don’t forget to flush your toilets to empty the water from the tanks and bowls.
Keeping Indoor Areas Warm
Maintaining a warm indoor environment is essential to prevent your pipes from freezing. Keep your thermostat set to at least 55°F, even if you’re away from home. This helps to ensure that the temperature inside your house remains above freezing. Alongside this you could control the humidity in your house as well and Chaffee can help you in that regard as they provide Tailored humidification services.
Besides that, open cabinet doors under sinks to allow warm air to circulate around the pipes. If you have pipes running through unheated areas like the garage or attic, consider using a space heater to keep those areas warm. However, always follow safety guidelines when using space heaters to prevent fire hazards.
DIY Winterization Guide
Winterizing your plumbing doesn’t have to be a daunting task. With a bit of preparation and the right tools, you can protect your pipes from freezing and avoid costly repairs. Here’s a step-by-step guide to help you through the process.
Step-by-Step Instructions
- Turn off the main water supply to your home.
- Open all faucets to drain any remaining water.
- Flush toilets to empty the tanks and bowls.
- Insulate exposed pipes with foam pipe insulation or heat tape.
- Seal any gaps or cracks around pipes with caulk or sealant.
- Disconnect and drain garden hoses.
- Install winter covers on outdoor faucets.
- Keep your thermostat set to at least 55°F.
- Open cabinet doors under sinks to allow warm air to circulate.
Tools and Materials Needed
Before you start, gather the necessary tools and materials. Here’s a list of what you’ll need:
- Foam pipe insulation
- Heat tape
- Caulk and caulking gun
- Pipe repair clamp or epoxy putty
- Winter faucet covers
- Utility knife or scissors
- Adhesive tape or zip ties
| Tool/Material | Purpose |
| Foam Pipe Insulation | Insulates pipes to prevent freezing |
| Heat Tape | Provides additional warmth to pipes |
| Caulk and Caulking Gun | Seals gaps and cracks around pipes |
| Pipe Repair Clamp or Epoxy Putty | Fixes minor leaks |
| Winter Faucet Covers | Protects outdoor faucets from freezing |
| Utility Knife or Scissors | Cuts insulation material to size |
| Adhesive Tape or Zip Ties | Secures insulation in place |
Regular Maintenance Tips
Regular maintenance is key to keeping your plumbing system in good shape throughout the winter. Check your pipes periodically for any signs of wear or damage. If you notice any leaks or cracks, address them immediately to prevent further issues.
Additionally, keep an eye on your water meter and bill for any unusual spikes, which could indicate a hidden leak. By staying proactive and vigilant, you can catch potential problems early and avoid costly repairs.
Professional Help: When to Call an Expert
While many winterization tasks can be done yourself, there are situations where professional help is necessary. If you have a complex plumbing system or encounter persistent issues despite your best efforts, it’s time to call in an expert.
Complex Plumbing Systems
Homes with intricate plumbing systems or those with older pipes may require a professional touch. An experienced plumber can assess your system and provide specialized solutions to ensure your pipes are adequately protected from freezing temperatures.
Persistent Issues Despite DIY Efforts
If you’ve followed all the steps to winterize your plumbing but still experience problems, it’s best to seek professional assistance. Persistent issues like recurring leaks or pipes that freeze despite insulation may indicate underlying problems that need expert attention.
Seeking Professional Assessment
When in doubt, it’s always a good idea to get a professional assessment. A licensed plumber can identify potential vulnerabilities in your plumbing system and recommend the best course of action. Investing in a professional assessment can save you time, money, and stress in the long run.
Conclusion
Winterizing your home plumbing is an essential task that can save you from the headache of dealing with burst pipes and costly repairs. By following these detailed steps and taking the necessary precautions, you can ensure that your plumbing system remains functional and protected throughout the winter. Remember, if you ever feel unsure or encounter persistent issues, don’t hesitate to seek professional help. Your home’s comfort and safety are worth the investment.
With a little preparation and effort, you can enjoy a worry-free winter knowing that your plumbing system is well-protected against the cold.
FAQs
How does winterizing your home’s plumbing help prevent freezing pipes?
Winterizing plumbing helps prevent pipes from freezing by insulating them, sealing leaks, and draining water from vulnerable areas. This process ensures that cold air cannot affect the plumbing, reducing the risk of burst pipes and costly repairs.
Should I turn off the main water valve when winterizing my plumbing system?
Yes, turning off the main water valve is crucial when winterizing your plumbing. It prevents water from running through the pipes and freezing, reducing the risk of bursts due to pressure within the pipes.
How does adding antifreeze protect your plumbing pipes?
Adding antifreeze to your plumbing system can help prevent any water remaining inside pipes from freezing, especially in areas like the crawl space. It’s particularly useful for homes that will be vacant during the winter.
What are the benefits of insulating plumbing pipes?
Insulating pipes helps prevent cold air from contacting the pipes directly, reducing the risk of freezing. Proper insulation maintains water flow even during freezing temperatures and is a key step in winterizing plumbing.
How do you winterize your outdoor plumbing, such as water lines and faucets?
To winterize outdoor plumbing, disconnect and drain garden hoses, shut off the main water supply valve to outdoor faucets, and cover them with insulated covers. This helps prevent water in the pipes from freezing and causing damage.
What should I do if my house plumbing is located near external walls?
For plumbing on bordering walls, it’s recommended to wrap pipes with insulation and seal any gaps to prevent cold air from affecting the pipes. You may also use heat tape for extra protection against freezing temperatures.
Why is draining all water from pipes important when winterizing?
Draining all water from the pipes prevents the water inside from freezing and expanding, which could cause breaks in the home’s plumbing. It’s especially important for vacant homes or areas with uninsulated pipes.
How does sealing leaks play a role in winterizing plumbing?
Sealing leaks with caulk or sealant prevents cold air from entering the plumbing system and freezing the water inside pipes. This step is crucial for protecting pipes from freezing and maintaining your plumbing system ready for cold weather.
What areas of a home are most vulnerable during winter plumbing maintenance?
Pipes in crawl spaces, basements, and attics are most vulnerable during winter as they are often exposed to cold air. Insulating and sealing these areas is essential to prevent freezing pipes.
When should I call a plumbing professional for help with winterization?
You should call a professional for winterizing complex plumbing systems or if you notice persistent issues, like frequent leaks or freezing, despite your DIY efforts. A professional can assess and repair any hidden problems effectively.
